Helpdesk
Using Helpdesk Web Part
The Helpdesk web part provides several functionalities:
1. Registration and Configuration
When the web part is added to the site, these are the initial mandatory configuration steps that must be completed before using the web part.
1.1 Registration Form
This dialog appears when a user adds the Helpdesk Works web part to the site for the first time. The user must provide the required details, such as Organization Name, Support Email, and Country, and then submit the form. This is a one-time setup process for a new installation.

1.2 Configuration
This module allows administrators to define custom display names for the Category and Sub Category fields, which are consistently used across the tool. ⚠️ This configuration screen appears only once—the first time the web part is added to a site—and only if the Category or Sub Category has not been set.
The administrator selects a preferred name for the "Category" field, which will be displayed across the tool. An "Other" option is available. If selected, the admin can input a custom name to be used as the Category label across the interface.


Similarly, the admin chooses a display name for the "Sub Category" field from a predefined list. An "Other" option for Sub Category allows the admin to define a custom label used consistently in the tool.


Before users can start submitting requests, the administrator must configure the request categories. These categories define how requests are classified and routed within the system.
To configure categories: Navigate to Admin → Categories from the main dashboard.
The admin can add categories in two ways:
1. Manual Entry
Enter the following details:
-
Category
-
Sub Category
-
Responsible Person Name
-
Common Issue
-
Priority (Optional)
Click Add to create the category.
2. Bulk Upload
-
Click on the dropdown arrow next to the Add button.
-
Select Bulk Upload.
-
Download the provided Excel template.
-
Fill in the required details as per the instructions in the template.
-
Upload the completed file to add multiple category entries at once.
Once the categories are successfully configured, users can navigate to Create Requests and start using the Helpdesk Tool to raise support requests.

2. Create Request
-
Users must select a Category and Subcategory (both required).
-
Users can add a short description, specify users in CC, and optionally upload attachments (files or images) relevant to the request.
-
Once the required fields are filled in, the user can submit the request.
-
Upon submission, an email notification confirms successful request creation with key request details.

3. Requested by me
This module displays all the requests submitted by the currently logged-in user.

-
Users can search requests by Short Description using the search box.
-
All columns can be sorted and filtered by clicking on the column header.
-
Request and Status can be filtered using their respective dropdown filters.
-
An Export to Excel option is provided with two modes:
-
Current View: Exports only the columns currently visible on the screen, as configured in the Edit View Columns settings.
-
Default View: Exports all available fields, including those not selected in the current view.


This enables users to efficiently track and export their submitted requests with flexible filtering and reporting options.

4. Assigned to me
This module displays all the requests that have been assigned to the currently logged-in user.
-
Includes visual analytics in the form of horizontal bar charts and pie charts to represent the number of requests assigned to the user.
-
Filtering options are like the Requested by Me module:
-
Allows searching across all columns using a search box.
-
Category and Status (via dropdowns)
-
An additional dropdown filter is provided for refining results specifically by Priority.
-
Users can export request data to Excel:
-
Current View: Exports only the columns currently visible, as configured via the Edit View Columns setting.
-
Default View: Exports all available fields, including those not currently selected for display.
-
This module displays all the requests that have been assigned to the currently logged-in user.

5. Admin Components
This module includes features that are exclusively accessible to administrators.
When a user logs in with standard (non-admin) access, they can only see the following modules:
-
Create Requests
-
Requested by Me
-
Assigned to Me
However, when a user logs in with administrator privileges, they gain access to three additional components that are hidden from regular users:
-
All Requests (Dashboard)
-
Settings
-
Report Request
-
Categories
These components provide administrators with enhanced visibility, configuration capabilities, and reporting functionality for managing the Helpdesk system more effectively.


5.1 All Requests
This module provides administrators with access to a comprehensive list of all requests logged in the Helpdesk tool.
-
Visual Analytics: Displays request data using horizontal bar charts and pie charts, offering a clear and immediate overview of request distribution.
-
Filtering Options:
-
Period Selector: A dropdown allows users to choose predefined timeframes such as Week to Date, Last Week, Month to Date, Last Month, Last 3 Months, and Year to Date. Based on the selected period, the Start Date and End Date fields auto-adjust and can also be manually updated to fine-tune the results.
-
Assigned To: A dropdown filter to view requests assigned to specific users.
-
Short Description: A search bar to filter requests based on keywords in the short description.
-
Category, Sub Category, Priority, and Status: Dropdown filters for refining the request list based on these parameters.
-
-
Excel Export Options:
-
Current View: Exports only the columns currently visible in the interface, based on the user’s selection in the Edit View Columns setting.
-
Default View: Exports all request fields, including those not currently displayed.
-

5.2 Create Request
This module enables administrators to create support requests on behalf of others. For example, if Person A encounters an issue and reports it to the administrator, the administrator can log the request through the Report Request module on their behalf.
Required Fields:
-
Category and Sub Category
-
Reported By (e.g., Person A – the actual requester)
-
Reported On (the date the issue was reported to the administrator)
-
Short Description
-
Priority
-
Status
-
Assigned To
The Assigned To field is auto filled based on the selected Short Description, but the administrator can manually change it to assign the request to a different person as needed.
Optional Fields:
-
CC
-
Detailed Description
-
Attachments (supporting files or images)
Once all mandatory information is provided, the administrator can submit the request. The request will then be logged under the name specified in the Reported By field and assigned to the person indicated in the Assigned To field.

5.3 Add Category
This section allows administrators to add, edit, or delete category items within the system. The responsible person can be a user or an Office 365 private or public group.
There are two methods to add categories:
-
Item: Used to add a single category item. The administrator can either select from existing Category and Sub Category values or create new ones. The corresponding Common Issue and Responsible Person must also be provided (all fields are mandatory). After filling in the details, clicking the Add button and selecting Item will insert the entry into the list.
-
Bulk Upload: Opens a panel where the administrator can download an Excel template, update it with multiple category items, and import the completed file using the Import Excel button. This enables bulk addition of entries to the Categories and Common Issues lists.

Additionally, a list of existing category items is displayed, which can be filtered by:
-
Search bar (for Common Issue or Category)
-
Category dropdown
Selecting an item from the list opens an edit panel, where the administrator can update or delete the selected category item.

5.4 Settings
The Settings module consists of three sub-components: Display Name, Email Signature, and Page. These are used for administrative configuration.
-
Display Name: Allows customization of Category and Subcategory display names.
-
Email Signature: Enables customization of the email signature text used when sending emails.
-
Page: Allows customization of the SharePoint interface and editing of Category and Subcategory display names.

5.4.1 Display Name
This sub-component allows the administrator to customize the display names of Category and Subcategory fields.

5.4.2 Email Signature
This sub-component allows the administrator to customize the display names of Edit Email signature text

5.4.3 Permission
This sub-component allows the administrator to configure whether users are permitted to close the requests they have created. When set to Yes, users can close their own requests. When set to No, users will not have permission to close their requests.

5.4.4 Page
This sub-component allows the administrator to configure SharePoint UI settings. Administrators can choose to show or hide specific SharePoint interface elements such as the O365 navigation bar, Hub navigation bar, Comments section, and Page title.
Additionally, this section provides the ability to edit the display names of the Category and Sub Category used throughout the tool.

6. Edit Request
This component is a common panel used across Requested by Me, Assigned to Me, and All Requests views. The panel opens when a user selects an item from the list and displays the details of the selected request.
For Users, editing is limited to the Detailed Description, adding comments, and updating or reopening requests. Users can close a request only if the option is enabled by the Admin under Settings → Permissions.

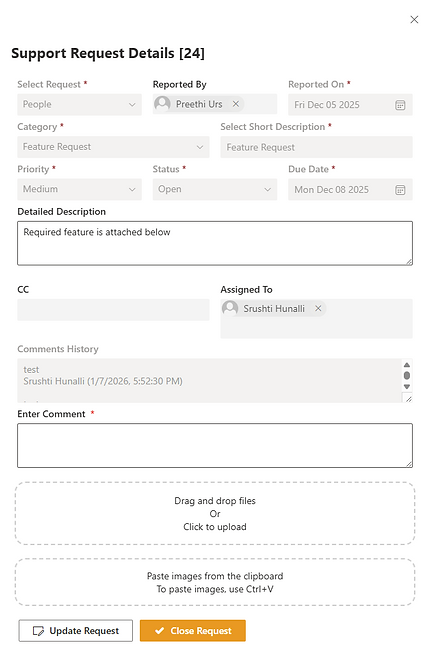
Responsible Persons and Admins have full access. They can edit all data fields, view the complete comment history, and add private comments by selecting the checkbox located at the top-right corner of the Enter Comment field (visible only to them). They are also allowed to update, close, and reopen requests.


