Time Usage Guide
Using Time Web Part
The Time web part provides several functionalities:
SELF
1. Home

-
User can do swipe in and swipe out to record the working time.
-
User can to Swipe in and Swipe Out multiple times during the day.
-
First in and Last out will be considered for Worked Hours calculation.
Also Upcoming holidays according to Holidays calendar; will be displayed in My Next Holiday Section.
2. Calendar
-
Calendars contains attendance status information of each day.
-
There are two types of calendars available: Weekly and Monthly. User can switch between these two.
-
Along with this, Apply leave and Regularise options are available in both type of calendars


3. My Attendance

In the My Attendance Section, there are some features available
-
Option to view attendance.
-
Request change-Regularise Time and Time Out.
-
Export attendance.
4. Apply Leave
Employees can apply for leave based on leave type and their leave balance availability. A request will be sent to the reporting manager for approval.

5. Leave Balance
View for user to see all types of leave balance available

6. My Leave Requests
-
View all leave requests created
-
Apply leave
-
Summary of leaves based on approval status
-
Filters by year, leave type, and approval status

7. Optional Holidays
-
In My Optional Holidays, there are some features available
-
User can view the Holiday’s list calendar of a location he belongs to
-
Based on the maximum number of optional holidays that the user can select user can choose optional holidays and submit them.
-
User can choose optional holidays and submit only when it is enabled by admin.

MY TEAM
1. Leave Approvals
-
This view is for the reporting manager to approve/reject the leave request.
-
Filters are also present to filter out the data.
-
They can export the leave data to Excel using the export option

2. Leave Balance
-
This view is for the reporting manager to view leave balances of all leave types of their reportees.
-
Filters are present to filter out the data.
-
The export option is available to export the leave balance data.

3. Leave Calendar
Reporting Manager view for viewing team members' leaves in the calendar

4. Attendance
Reporting Manager View for viewing attendance details of all their reportees.
Filters are also available to filter out the data.
Shows a summary of all statuses based on filters.
The export option is also available for exporting data to excel.

5. Regularization Approvals
Reporting Manager view for approval/rejection of attendance regularization reques

6. Team Optional Holidays
Reporting Manager view for viewing opted optional holidays of the team

7. Shift Assignment
Reporting Manager view for updating shift of their team members

REPORTS
Reports are available only for administrators. This contains Attendance Report, Leave Balance report and Leave Requests report along with some actions.
1. Attendance Reports
-
Attendance report contains information of attendance data of the whole organization which can be used for analysis.
-
Shows a summary of all statuses based on filters.
-
Filters are also available to filter out the data.
-
The export option is also available for exporting data to excel.
-
Columns can be configured which has to be displayed in the list.
Along with above features, there are some functionalities available.
• Add
• Edit
• Regularize Attendance

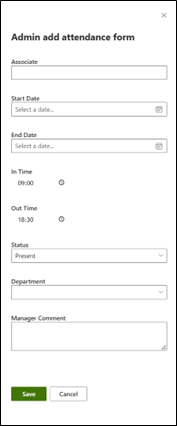
Add Attendance
-
Attendance can be added for any associate for a date range.
-
Steps:
i. Select Associate
ii. Select Start and End date
iii. Enter In Time and Out Time.
iv. Select Attendance Status.
v. Select Department if it is not prepopulated.
vi. Enter any comments requested by manager.
vii. Click on Save.
Edit Attendance
Edit option can be used to edit any attendance record.
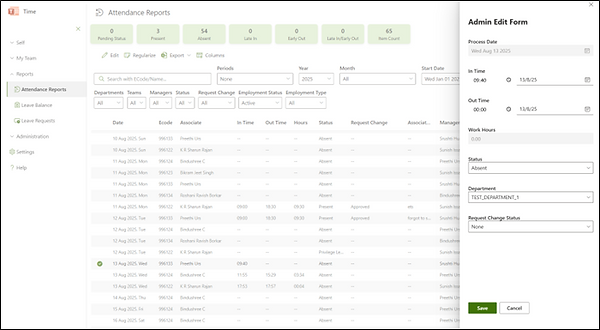

Regularize Attendance
This option can be used to bulk regularise the selected multiple attendance records by filling required fields.
One more option available to regularize if we have not selected any record but want to regularize for an associate. In this case associate has to be selected along with other fields such as Start date, End date, In Time, Out Time and other required fields.
Additional feature available in this regularization option is we can apply regularizations only for absent records. If we do not want option and regularize irrespective of status, we can disable that option before saving

2. Leave Balance
-
Leave Balance report contains information of leave balance of all associates which can be used for analysis.
-
Filters are also available to filter out the data.
-
The export option is also available for exporting data to excel.
-
Columns can be configured which have to be displayed in the list.

Along with above features, there are some functionalities available.
• New: For adding leave balance
• Edit: For editing leave balance


3. Leave Requests
-
Leave Requests report contains information of all leave requests of all associates which can be used for analysis.
-
Shows a summary of all statuses based on filters.
-
Filters are also available to filter out the data.
-
The export option is also available for exporting data to excel.
-
Columns can be configured which have to be displayed in the list.

Additionally, Administrator can approve/reject leaves on behalf of the manager.
4. Optional Holidays
-
Optional Holidays report contains information of all opted Optional Holidays of all associates which can be used for analysis.
-
Shows a summary of all statuses based on filters.
-
Filters are also available to filter out the data.
-
The export option is also available for exporting data to excel.

5. Shift Reports
Administrators can download the ShiftWise report and statistics.

SETTINGS
1. General
This screen contains the tool related settings. It can only be accessed by the administrators
-
The user can change the time zone of the default location.
-
The user can switch between the default Application theme and site theme.
-
The user can switch the List display type between Excel style and normal.

2. Leave
-
Setting Start date and End Date for allowing leave application.
-
Setting for allowing leave application for contract-based associates.
-
We can enable/disable email notifications related to leave applications.
-
We can configure whether the user is allowed to apply sick leave or not if they are in a notice period.
-
Maximum sick leaves can be availed without requiring document proofs can be configured.
-
Enable/disable allow team manager to do approvals.

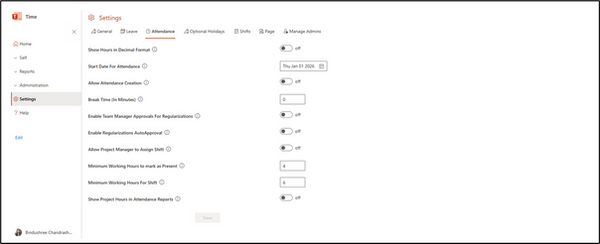
3. Attendance
Time Display & Tracking
-
Show Hours in Decimal Format: When turned on, time is shown as a number (e.g., 8.5 hours instead of 8 hours and 30 minutes). This is often helpful for payroll calculations.
-
Start Date For Attendance: This is the "Go Live" date for the system. Attendance tracking and calculations will begin from this specific day.
-
Break Time (In Minutes): Enter the standard amount of time (like 30 or 60 minutes) that should be deducted for daily breaks.
Manual Entries & Corrections
-
Allow Attendance Creation: When enabled, this allows employees to manually add an attendance record if they forgot to clock in or out.
-
Enable Team Manager Approvals for Regularizations: If an employee asks to "regularize" (fix) a past attendance error, this setting requires their manager to review and approve it first.
-
Enable Regularizations Auto-Approval: If this is on, any requests to fix attendance errors are approved by the system immediately without needing a manager’s signature.
Shift & Project Management
-
Allow Project Manager to Assign Shift: This gives Project Managers the authority to schedule or change the work shifts for their specific team members.
-
Show Project Hours in Attendance Reports: If your team tracks time against specific projects, turning this on will include those project-specific details in the main attendance summary.
Attendance Rules
-
Minimum Working Hours to mark as Present: The fewest number of hours an employee must work to be officially counted as "Present" for the day (e.g., 4 hours).
-
Minimum Working Hours for Shift: The total number of hours required to consider a full work shift "complete."
4. Optional Holidays
Optional holidays (also known as "floating" or "restricted" holidays) allow employees to choose a few days off from a pre-approved list. These settings help you manage who can pick them and when.
Eligibility & Access
-
Enable Optional Holidays: This is the master switch. When turned on, employees will be able to see and select optional holidays in their calendar.
-
Enable Optional Holidays For Contract Associates: Turn this on if you want contract-based staff to have the same holiday choices as full-time employees.
-
Enable Optional Holidays For New Joiners: When enabled, employees who have recently joined the company are eligible to pick optional holidays right away.
Deadlines & Notifications
-
Optional Holiday Selection End Date: This is the "deadline" for employees to make their choices. After this date, the system will lock its selections for the year.
-
Optional Holiday Disabled Message: This is the custom note an employee sees if they try to change their holiday after the deadline has passed. (e.g., "Your selected holidays are locked...").
Calendar Customization
-
Optional Holiday Color: This allows you to choose the color used to highlight optional holidays on the team calendar (currently set to blue), making them easy to spot.
-
General Holiday Color: This sets the color for standard, company-wide public holidays (currently set to green) so they stand out from optional ones

5. Shifts
The Shifts tab is where you create and manage the specific work hours for your team. Each row represents a unique schedule that can be assigned to employees.
-
Shift Name: This is the label for the schedule (e.g., "General," "First," or "Second"). It helps employees and managers identify which hours are being worked.
-
Start Time: The official time the workday begins for this shift.
-
End Time: The official time the workday concludes.
-
Allowance: A field to enter a daily monetary bonus or "Shift Differential" given to employees working specific hours (for example, a higher amount for the late-night "Second" shift).
-
Regularize Display Time: This setting defines a specific time window used for correcting attendance records on the same day. If left blank, the system typically defaults to the standard shift hours.

6. Page
This controls the SharePoint Page appearance, generally to get more space for the tool

7. Manage Admins
This allows to add new admins or remove existing admins
